


The Ultimate Guide to Google Ads: Learn How to Create Successful Campaigns
Google Ads is a powerful tool that can help you reach new customers and grow your business. But with so many features and options, it can be difficult to know where to start. That’s why we’ve created this ultimate guide to Google Ads.
In it, you’ll learn everything you need to know about how to use Google Ads, from the basics of setting up your account to more advanced features like remarketing and dynamic search ads.
We’ll also share some tips and tricks that will help you get the most out of your Google Ads campaigns. So whether you’re just getting started with Google Ads or you’ve been using it for a while, this guide will help you take your campaigns to the next level.
Ready to get started? Let’s dive in!
What are Google Ads and How do They Work?
Google Ads are online ads that appear on Google’s search engine and other sites across the web. Advertisers pay to have their ads shown when people search for certain keywords or visit websites in Google’s network.
When someone clicks on an ad, they’re taken to the advertiser’s website or landing page. Advertisers only pay when someone clicks on their ad, and they can set a daily budget to control how much they spend.
Google Ads are a form of pay-per-click (PPC) advertising, which means you’re only charged when someone clicks on your ad. PPC is a great way to drive targeted traffic to your website and generate leads or sales.
Now that you know what Google Ads is and how it works, it’s time to set up your account. In this section, we’ll walk you through creating a Google Ads account and setting up your first campaign.
Creating a Google Ads Account

Before you can start using Google Ads, you’ll need to create a Google Ads account. If you already have a Google account (for example, if you use Gmail), you can use that to sign in to Google Ads. Otherwise, you’ll need to create a new Google account.
Once you’re signed in, you’ll be taken to the “Create your first campaign” page. Here, you’ll need to select your campaign type. The “Search Network only” option will be the best choice for most businesses.
Then, you’ll need to enter some basic information about your business, such as your business name and website URL. You’ll also need to choose your country and time zone.
Once you’ve entered all of the required information, click “Continue.”
Creating Your First Campaign
Now it’s time to create your first campaign. Start by giving your campaign a name so you can easily identify it later. Then, select your campaign type. As we mentioned above, most businesses will want to choose the “Search Network only” option.
Next, you’ll need to choose your campaign subtype. There are three options to choose from:
Standard: This is the recommended option for most businesses. With Standard campaigns, you have full control over your settings and can customize your ads to match your marketing goals.
Accelerated: Accelerated campaigns are designed to get your ads in front of as many people as possible, as quickly as possible. With this option, you’ll have less control over your settings and your ads may not be shown as often as they would be with a Standard campaign.
All Features: All Features campaigns give you access to all of the features that Google Ads has to offer. This option is best for businesses that have a lot of experience with Google Ads and are comfortable managing complex campaigns.
For most businesses, Standard campaigns will be the best choice. Once you’ve selected your campaign type, click “Continue.”
Setting Your Budget and Bidding
Now you’ll need to set your budget. Your budget is the amount of money that you’re willing to spend on your campaign each day. We recommend starting with a small budget (e.g., $5-$10 per day) to begin with. Once you’ve set your budget, click “Continue.”
Now you’ll need to choose your bidding strategy. There are two options to choose from:
CPC (cost-per-click): You’ll pay each time someone clicks on your ad with CPC bidding. This is the recommended option for most businesses.
CPM (cost-per-thousand impressions): You’ll pay each time your ad is shown 1,000 times with CPM bidding. This option is best for businesses that want to build brand awareness and reach as many people as possible.
Once you’ve selected your bidding strategy, click “Continue.”
Ad Group And Keyword
Now you’ll need to set up your ad group. Start by giving your ad group a name. Then, enter your targeted keywords. These are the words or phrases you want your ad to show up for when people search on Google.
You can add as many keywords as you want, but we recommend starting with a small number (5-10). This will help you keep your ad group focused and make it easier to manage your campaign.
Once you’ve added your keywords, you’ll need to write your ad. Your ad should be clear and concise, including your targeted keywords. Remember that you only have a limited amount of space, so make sure your ad is focused and to the point.
When you’re finished, click “Save and continue.”
Ad Extensions
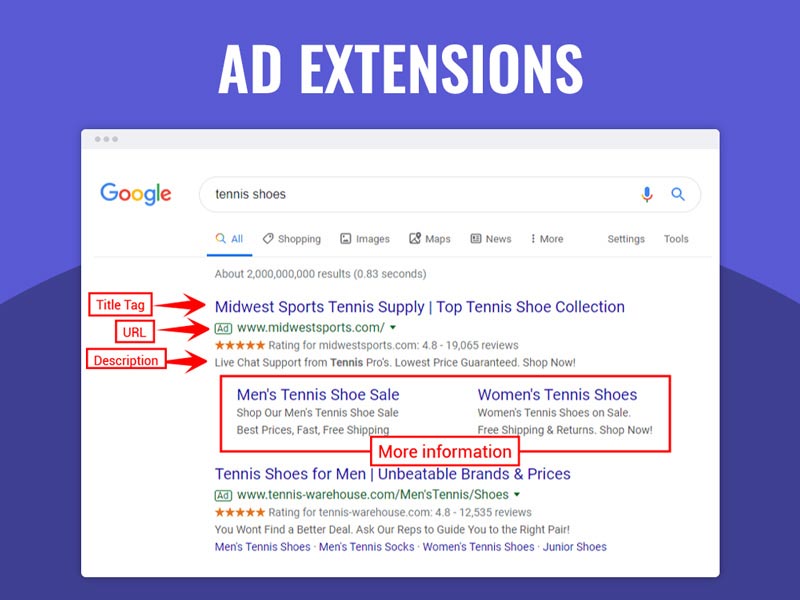
Ad extensions are optional features that you can add to your ads to make them more effective. There are many different types of ad extensions, but some of the most common include:
Site links: These are additional links that you can add to your ad that lead to other pages on your website. Site links can be a great way to direct people to specific pages on your website, such as your product page or your contact page.
Callouts: Callouts are short pieces of text that you can add to your ad. They’re typically used to highlight special features or services that you offer. For example, you might use a callout to highlight free shipping or 24/7 customer support.
Location: The location extension allows you to add your business’s address to your ad. This is a great way to let people know where you’re located and make it easy for them to find you.
To add an extension to your ad, click on the “Ad extensions” tab. Then, click “View:” and select the extension that you want to add.
Once you’ve added your extensions, click “Save and continue.”
Targeting Your Audience
Now you’ll need to choose who you want to see your ad. You can target people based on their location, language, demographics, interests, and even past behavior.
To start, click on the “Audience” tab. Then, select your targeting options. We recommend starting with location and language, to begin with.
Once you’ve selected your audience, click “Continue.”
Selecting Your Placements
Now you’ll need to choose where you want your ad to be shown. You can choose to show your ad on Google’s search results page, on other websites, or on mobile devices.
To start, click on the “Placements” tab. Then, select the placement option that you want to use. We recommend starting with “Automatic placements” to begin with. This will allow Google to show your ad on the most relevant websites and mobile apps.
Once you’ve selected your placements, click “Continue.”
Schedule and Delivery
Now you’ll need to choose when you want your ad to run. You can choose to run your ad continuously, or you can set specific start and end dates. We recommend running your ad continuously to begin with.
To start, click on the “Schedule” tab. Then, select the “run my ad continuously” option.
Once you’ve selected your schedule, click “Continue.”
Pricing and Payment
Now you’ll need to enter your payment information. You can choose to pay with a credit card or with Google Wallet. We recommend using a credit card, to begin with.
To start, click on the “Pricing” tab. Then, enter your credit card information.
Once you’ve entered your payment information, click “Continue.”
Review and Launch
You’ll need to review your ad and make sure that everything is correct. Once you’re happy with your ad, click on the “Launch” button to launch your campaign.
Congratulations! You’ve just created your first Google Ads campaign.
How Much Does Google Ads Cost?
The cost of Google Ads depends on several factors, including the type of campaign you’re running, the keywords you’re targeting, and the amount you’re willing to pay per click. Businesses should expect to pay $1-$2 per click on average for their Google Ads campaigns.
Read more: HOW CAN I GENERATE LEADS WITH A LIMITED MARKETING BUDGET?
How to Measure the Performance of Your Google Ads Campaign
Once your Google Ads campaign is up and running, it’s important to track its performance so you can see what’s working and what’s not. Google provides several tools and reports that you can use to track the performance of your campaign.
Google Analytics is a free tool that integrates with Google Ads and provides detailed information about your website traffic. If you’re not already using Google Analytics, we recommend setting it up so you can track the performance of your Google Ads campaigns.
The “Search Terms” report in Google Ads shows the actual keywords that people are using to trigger your ads. This report can be very helpful in identifying new keywords to target.
The “Ad Performance” report shows how your ads are performing. This report can help identify which ads are performing well and which ones need to be improved.
The “Keywords” report shows how your keywords are performing. This report can help identify which keywords are driving clicks and conversions, and which ones need to be improved.
The “Geo Performance” report shows how your ads are performing in different geographic locations. This report can help identify which locations are providing the most clicks and conversions.
Google Ads also provides several other reports that can help track the performance of your campaign. Be sure to explore all of the different reports so you can get the most out of Google Ads.
Google Ads is a powerful tool that can help businesses reach new customers. However, it’s important to understand how Google Ads works before getting started. This guide provides an overview of how to create a Google Ads campaign and track its performance. By following the steps in this guide, you’ll be well on your way to success with Google Ads.